These are the easiest desserts...breakfast treat to make. Just because of the shape, people/your family will be intrigued. They will be convinced you are a gourmet cook! Go for it and make them keep believing we are gourmet cooks and keep our little secret of how easy these are to make. :)
You start with your Basic Bread Recipe!
Step one:
Roll out ropes of bread dough about 6 to 7" long and about 1/2" in diameter. Roll these ropes in melted butter and then a cinnamon/sugar mixture.
Step Two:
Tie the 'rope' once and then stuff it into a greased
stainless steel muffin pan. No need to let it rise but pop it right
into your 350 degree oven and bake until golden brown (about 15-20
minutes.)
This is like eating the center of a cinnamon roll with every bite. My mouth is watering as I type. I think I will go eat one with my cup of coffee that is calling me....enjoy. :)
Showing posts with label recipe of the week. Show all posts
Wednesday, July 31, 2013
Friday, May 10, 2013
Slow Cooked French Toast!
Have you ever wanted a new and different idea for Mother's Day. There is always the traditional breakfast ideas, but this one is soooo different!! I must admit, I don't think I would make it for breakfast as it only has to cook about 3-4 hours which means I would be getting up way too early in the morning to have this breakfast ready for breakfast. I have become a morning person but this would be over the top. I would be like all those doughnut shop/bakery people who get up at 2 a.m. to 3 a.m. to have those fresh baked goods ready for us to consume. I just don't have the DNA to do that. Kudos to those who do get up and have those fresh pastries ready for us.
So how would I use this luscious recipe? I would make it for the dessert finale of the Mother's Day Meal. It would be cooking through the morning and be hot and ready for dessert. I can't tell you how good this breakfast...dessert is. My kids kept asking me when it would be ready as the smell permeated the house. Then, it was like holding back a starving animal from its food. My kids were far from starvation but you would have thought they hadn't seen food in years the way they dug into this breakfast dessert!
Humm? Am I recommending this dish? YES!!! It is worth trying. So without further ramblings...here we go!
Slow Cooked French Toast
Found & Adjusted from Taste of Homes
1 1/2 cup raw sugar
1 1/2 tsp cinnamon
1/2 cup butter
12 slices whole wheat bread
2 cups fresh blueberries
6 eggs (slightly beaten)
1 1/2 cups whole milk
1 tsp vanilla extract
1/2 tsp salt
garnish with fresh blueberries and whip cream
Step One: Butter inside of the crock pot. Mix raw sugar, cinnamon and melted butter. Put 1/4 of sugar mixture on bottom of the crock pan. Put 4 slices of bread on the bottom. Cover with another 1/4 sugar mixture and sprinkle with blueberries; Repeat this step with each layer of bread.
Step Two:
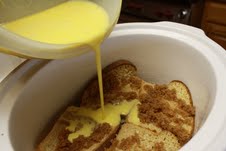
Mix eggs, milk, vanilla extract, salt. Pour over the bread mixture.
Step Three:
Turn crock pot on Low Setting. Cook for 3 to 4 hours or until egg mixture is solid/cooked.
Garnish with whip cream and blueberries.
Note from Paula:
If your mom is not a blueberry fan, try peaches...strawberries. This is a fun, delicious breakfast OR dessert for Mom! Can I say YUM!! Enjoy!
Saturday, May 4, 2013
Whole Wheat Calzone
Here is yet another thing you can do with bread. I love my Bosch Universal Mixer because it makes life so easy to create fantastic food! This time I am making Whole Wheat Calzone using my basic whole wheat bread recipe...First you go to the basics and make your Basic Whole Wheat Bread Recipe!
Pick your basic whole wheat bread dough recipe size here: http://www.paulasbread.com/recipes.html#5loaves
Whole Wheat Calzone
Step One: Roll the bread dough 1/2" thick into a round circle. Your circle will be depend on the size servings you want to make. I made individual calzones so I made small 6" circles.
Step Two: Place the filling of your choice on one side of the circle. Pepperoni and grated cheese; Thinly sliced roast beef and grated cheese; spinach, ricotta cheese & mozzarella cheese; the list goes as far as your imagination!
Step Three: Fold the other half the bread dough circle over the side with the filling. With fork tongs, press the edges tightly together.
Step Four: Bake 350 degrees till golden brown.
Step Five: Pasta dip. I simply used tomato sauce mixed to taste with Pizza Seasoning. You could have an alfredo dip; cheese dip...again, let your imagination go!!
Monday, April 1, 2013
Whole Wheat Doughnuts!
My kids love doughnuts and I hate to see them eat the processed doughnuts at the store. I try hard to turn my eyes when their dad takes them for the occasional doughnut trip. They usually don't want me to go along as I find myself commenting on all the saturated fats, sugars and empty calories. I am not very fun company when you are wanting to indulge. Well, at least when it comes to the high processed sugar stuff. Humm...I know you are thinking all my desserts listed on the blog don't reveal someone who hates sugar or chocolate. I guess it is the chemicals and saturated fats that get to me.
I started thinking about how much my kids like doughnuts and started searching the web for different doughnut recipes. I took all the recipes into account and created my own. One common ingredient that all the doughnuts have is nutmeg which was interesting to me. I am not a nutmeg lover, however, this is one of the seasonings that you don't want to pass up when making doughnuts. For those who like the doughnut flavor, it is the nutmeg that makes you think you are eating a doughnut!
Without further ramblings...onto
Whole Wheat Doughnuts!!
Ingredients:
2 cups scalded whole milk
8 Tbs raw sugar
1 tsp sea salt
1 tsp nutmeg
1/4 cup oil*
4 Tbs. SAF yeast
4 cups sifted whole white wheat flour**
Directions:
Scald the milk. Put into your Bosch Bowl Mixer. Add sugar, oil, salt, nutmeg. Check the temperature of your milk mixture. If it is back to lukewarm (100 degrees), add your SAF yeast. The reason you want to wait on the yeast is so you won't kill the yeast with the liquid being too hot.
Add the flour and knead in your Bosch Mixer with the dough hook for 5 minutes.
Roll out 1" thickness and cut in 2" size. I do not have a doughnut cutter so I simply used the biscuit cutter and then poked a middle hole with my finger. Set them on a cookie sheet to let rise (about 5 minutes.)
Fry on each side till lightly golden brown. Be careful not to have your oil too hot as the doughnuts will burn on the outside and the inside will be raw dough.
Now for the fun part. Drain slightly on a paper towel to get the excess oil off the doughnut. Then, place the doughnut in the favorite topping of choice. Cinnamon/sugar...powdered sugar? Place the sugar mixture in a zip lock bag to coat the doughnut. Another option: set on a cooling rack and drizzle runny icing over the doughnut. This lets it coat the doughnut. My kids love chocolate and melted chocolate on a doughnut is a dream come true! :)
Wednesday, March 27, 2013
Chocolate Easter Baskets!
Something about holidays makes me deviate from the normal healthy recipes. I do try to make some healthy but there are just too many fun ideas out there to make that are just plain fun. I guess I could have gone to the health food store and gotten carob chips but the semi-sweet chocolate chips were there and handy.
I saw this recipe on foodnet and it was just too fun to not make. It is actually easy! Hurray! This meets my criteria of cooking: easy and fast! I did change their recipe from using the large muffin pan to a mini muffin pan as the chocolate nests were too big and way to much sugar and chocolate to enjoy in a large serving. The smaller mini muffin pan made the bite size serving that would be good on a dessert tray and makes Easter a festive time. Great dessert to make and you can whip it up EASY!
Easter Chocolate Nests/Baskets
Shoestring Potato Chips (also called Potato Stix)
Semi-sweet chocolate chips (12 oz.)
Melt the chocolate chips either in the micro wave or place in bowl with warm water under the bowl of chocolate chips to melt the chips. Fold in the potato string chips.
Dab a spoonful in the mini muffin pan and press down the center. Refrigerate for 3 hours. Decorate with 2-3 Easter egg malt balls or jelly beans.
Have fun eating and serving the Chocolate Easter Baskets!
Friday, February 22, 2013
Tie the Knot Dinner Rolls
Here is a fun 'twist' to your basic bread recipe. There are so many fun things you can do with bread and here is yet one more thing you can make with your basic whole wheat bread making it a delicious dinner roll.
Tie the Knot Whole Wheat Garlic Rolls
Step One:Form small rope (3" length) of dough. Roll the rope in butter and garlic.
Step Two:
Tie it once, like you would tie your shoe lace. Let rise about 15 minutes.
Step Three:
Bake 350 till beginning to brown...about 15 minutes. Brush melted butter over the hot rolls.
Enjoy eating...my family sure did!! Join my social media for step by step pics!
Tuesday, December 4, 2012
Candy Cane with a new Twist
Here is a fun 'twist' to your basic bread recipe.
There are so many fun things you can do with bread and here is yet one
more thing you can make with your basic whole wheat bread making it a
fun Christmas treat.
Step One:
Divide the dough into small ropes.
Step Two:
Butter the ropes. Roll one rope in white sugar. Roll one rope in sugar dyed red. Twist the two ropes and form into a candy cane. Put immediately into the oven. You don't want to let the bread candy canes rise as it will distort the shape.
Step Three:
Bake 350 till beginning to brown...about 15 minutes.
Enjoy eating...my family sure did!!
Candy Cane Bread
Make the basic whole wheat bread recipe (Click here)Step One:
Divide the dough into small ropes.
Step Two:
Butter the ropes. Roll one rope in white sugar. Roll one rope in sugar dyed red. Twist the two ropes and form into a candy cane. Put immediately into the oven. You don't want to let the bread candy canes rise as it will distort the shape.
Step Three:
Bake 350 till beginning to brown...about 15 minutes.
Enjoy eating...my family sure did!!
Monday, October 29, 2012
Apple Blueberry Crisp
My wonderful daughter decided we needed a dessert to perk up the family with mom down...long story of recovery from surgery. I have enjoyed sitting back and letting her creative juices fly and getting to benefit from the delicious cuisine that is coming from out kitchen. I hope you enjoy this dessert with a fall flair!
We found this recipe in a Taste of Homes magazine but then adapted it to our liking. My daughter knows I love blueberries and apples are the fruit of the fall. Why not make an apple BLUEBERRY crisp. Yes!!
Apple Blueberry Crisp
4 cups sliced peeled tart apples
2 cups fresh or frozen blueberries
1/4 cup Xagave (click here)
1/4 cup thawed orange juice concentrate
2 Tbs whole wheat white flour (click here)
1 tsp ground cinnamon
Topping:
1 cup granola *
1/4 cup Xagave (click here)
2 Tbls whole wheat white flour (click here)
1/2 tsp cinnamon
1/3 cup cold butter cubed
Step One:
Combine first six ingredients. Transfer to stainless steel greased pan.* Now for the delicious topping! Combine granola and next 4 ingredients. Spread over the fruit mixture.
Step Two:
Bake 350 degrees for 30 minutes or until golden brown. It is really good served with vanilla ice cream. Yum!
*Concerning the granola, I used the homemade granola that I always have on hand. (Click here for that recipe). You could use a store bought granola or used regular rolled oats. The regular rolled oats will not be as flavorful but if its handy in the pantry, go for it.
** I like using stainless steel because it is a clean metal to cook with. It doesn't leach metals back into your food products. Plus, I call them a life time pan. They don't have a life time warranty but my pans are over 20 years old and still look like brand new.
Monday, October 15, 2012
Barbecue Chicken in Your Crockpot!
True to making this month theme the month of crock pot cooking with easy recipes, here we go with another type crock pot flavor! This recipe is wonderful with only 3 ingredients! This can be thrown together and left. Dinner will be ready for you with little work on your part! My type of cooking. You will love this sweet and sour type of chicken. Enjoy!
Ingredients:
4-6 Boneless frozen Chicken Breasts
1 Bottle Honey Style Barbecue Sauce
2 - 20 oz. can Pineapple Chunks, drained
Directions:
Spray the inside of your crock pot with cooking spray for an easy cleanup! Place frozen chicken breasts in the crock pot and cover with barbecue sauce. Empty can of drained pineapple chunks on top. Cook on High for 2-3 hours or Low for 4-6 hours. Remove and shred chicken with Bosch Universal Plus Mixer gourmet whisks. Return the shredded chicken to the crock pot and stir well coating chicken with sauce. Serve over rice.
Really, you put the frozen chicken, barbecue sauce and pineapples in the crock pot; turn it on and leave it!!
I took the chicken out of the crock and put the chicken meat in my Bosch bowl with the gourmet wire whips. In seconds, the chicken was nicely shredded. Back to the crock pot and ready to serve!
I love things to be easy. As an after thought, I put the rice directly into the sauce. We served it like a rich barbecue soup. It was delicious AND the rice filled my hungry kids up. I/you will be able to really stretch this meal adding the rice directly to the barbecue chicken.
This is a definite keeper for this winter. Fast and easy AND delicious!!
Wednesday, October 10, 2012
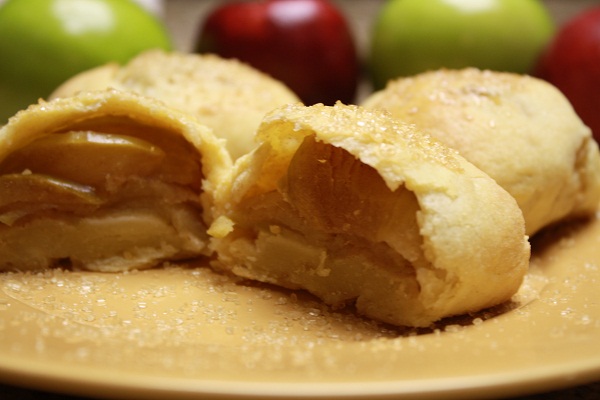
Mini Apple Turnovers
3/4 cup butter softened
1 egg, separated
3 Tbs cold water divided
2 cups pastry flour sifted*
7 cups thinly sliced/cored apples
3/4 cup raw sugar
1 1/2 tsp ground cinnamon
Step One:
In your Bosch bowl, beat cream cheese and butter till smooth. If you use the Bosch bowl scraper,
it will enhancer the mixing. Beat egg yolk and 2 Tbs water into cream
cheese mixture. Gradually add flour. Shape pastry into a ball and
refrigerate for 1 hour.
Cover dough and put in the fridge for one hour.
Step Two:
In
large skillet, combine apples, sugar and cinnamon. Cover and cook over
low heat till tender for about 8-10 minutes. This is a wonderful time
to use your Bosch Slicer/Shredder attachment. You will have the slicing task done in the blink of an eye!
Step Three:
Turn the pastry dough onto a lightly floured surface. Roll
1/8th inch thick; cut into 4" circle; top each circle with apple
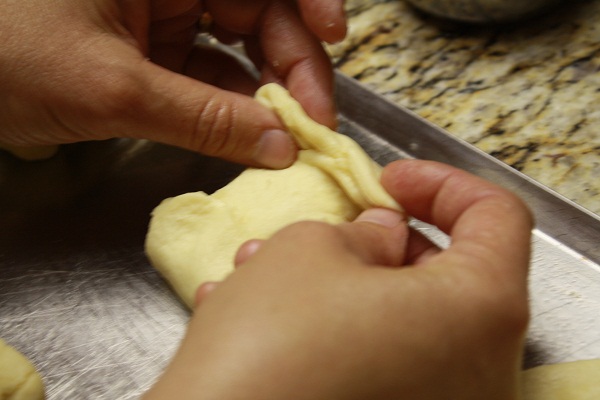
mixture. Fold pastry over filling and seal well. Brush with water to
help seal.
Step Four:
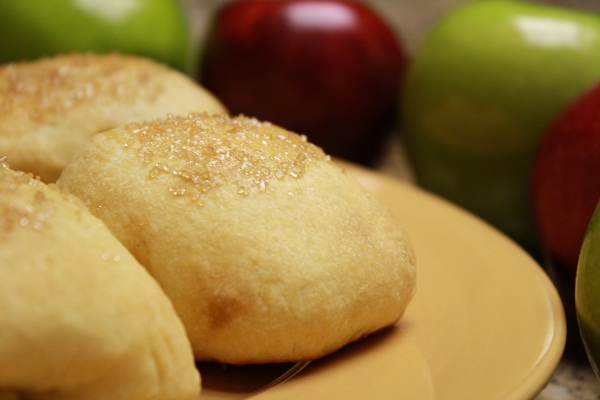
In small bowl, whisk egg white and remaining water; brush over pastry. Sprinkle with sugar.
Step Five:
Bake 375 degrees for 18-22 minutes.

Great when served with vanilla ice cream!! Yum!!
Subscribe to:
Posts (Atom)


copy.jpg&container=blogger&gadget=a&rewriteMime=image%2F*)


copy.jpg&container=blogger&gadget=a&rewriteMime=image%2F*)


copy.jpg&container=blogger&gadget=a&rewriteMime=image%2F*)


copy.jpg)


copy.jpg)